How to Build a One-Shot Dungeon in Six Steps (With Free Tables)
A one-shot dungeon has one job: a full adventure in a single evening. Here is the six-step way we build one, with a worked example and free d6 tables for every step.
A one-shot dungeon has one job. It has to give your group a full adventure in a single evening. So the place stays small, and every room in it does something different.
This is the guide that goes with our One-Shot Dungeon Builder booklet. It walks through the same six steps the booklet uses, builds a full example dungeon as it goes, and adds the random tables we didn't have room to print. If you have the booklet, the page numbers below match it. If you don't, plain paper works just as well.
If you just want the tables, skip to the Random Tables at the end of the post.
What a one-shot dungeon needs
Keep it small. Five or six rooms is plenty for one session. Sly Flourish, who writes a lot about lean prep, puts a typical single-session dungeon at three to nine rooms, and most often five.
Give the party one clear goal. They should know what they came for before they reach the door.
Give them choices. A loop or a second way in lets the players pick their route, so the map feels like a place and not a hallway.
Put in at least one problem that a fight won't solve: a flooded hall, a locked door with a riddle, a guardian that can't be beaten. It gives the players who aren't built for combat something to do.
The six steps at a glance
- The background. Why the place was built, what happened to it, who's there now, and what the party wants inside.
- The map. A rough sketch first, then the real map.
- The rooms. What's in each room, starting with the ones that matter most.
- Adversaries. Who the party might fight, and who might talk instead.
- Treasure and hidden things. What can be found, and what takes a little looking.
- Hooks and secrets. Why the party goes in, and what they can learn once they're there.
The order matters less than you'd think. We put hooks last because they're easier to write once you know what's inside, but plenty of GMs start with the hook. Start wherever the idea is.
Our example: the Weeping Observatory
We'll build one dungeon all the way through so you can see each step filled in. The booklet's eight tables are printed inside its back cover. Here they are, with what we rolled on each. Rolls are a starting point: if one doesn't fit, take the next line down or pick one you like better.
Origins. Roll d6 for each column and combine the results.
| d6 | Structure | d6 | Built By |
|---|---|---|---|
| 1 | Crypt | 1 | Heretics |
| 2 | Mine | 2 | Dwarves |
| 3 | Prison | 3 | A Mad Baron |
| 4 | Bathhouse | 4 | Alchemists |
| 5 | Observatory | 5 | Storm Giants |
| 6 | Wizard's Tower | 6 | A Lich |
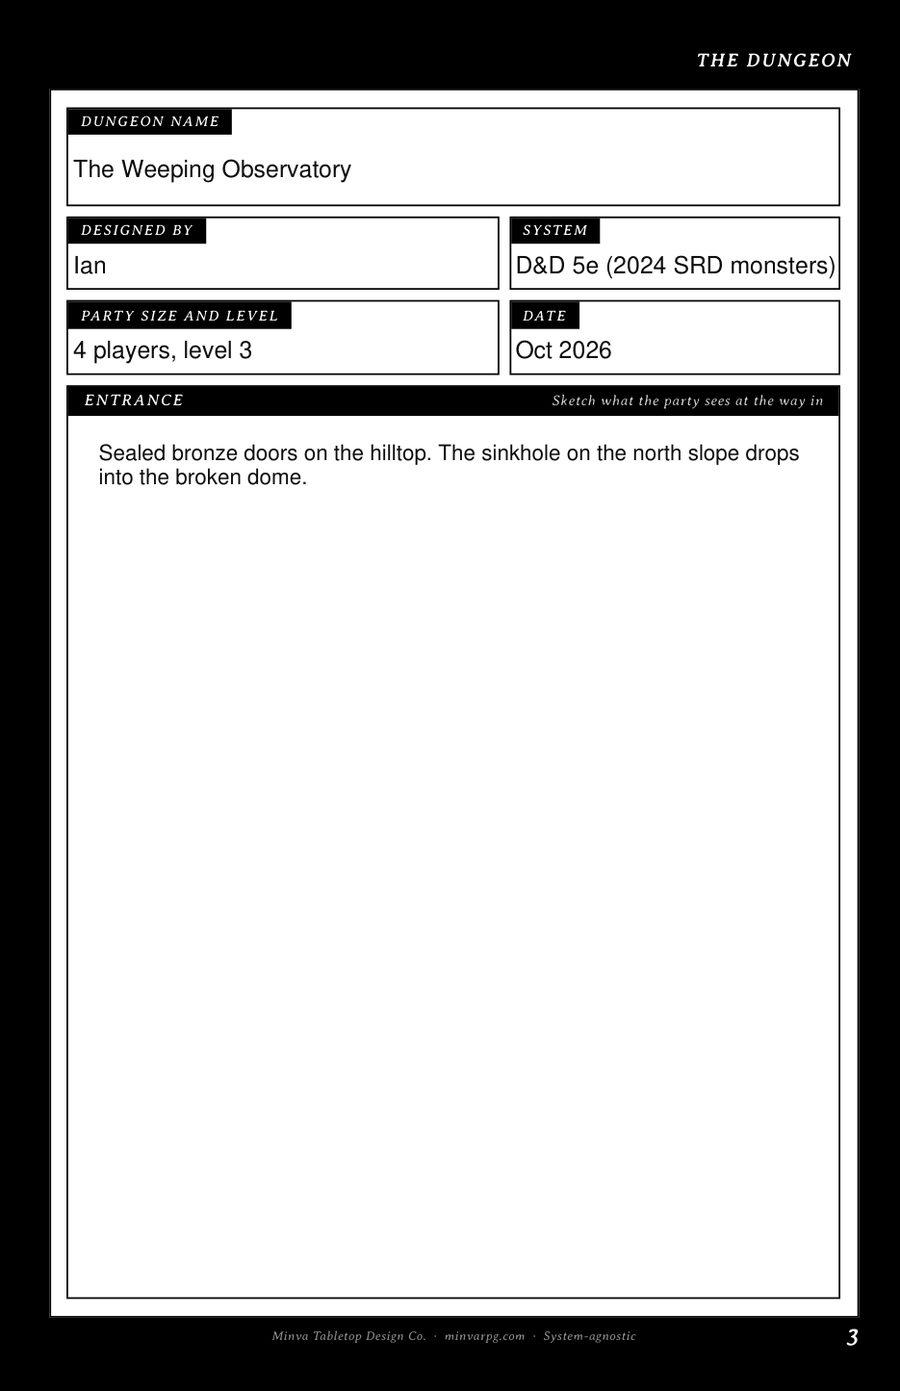
We rolled a 5 and a 3: an observatory, built by a mad baron.
Histories
| d6 | History |
|---|---|
| 1 | Still in Use |
| 2 | Sealed on Purpose |
| 3 | Forgotten |
| 4 | Taken Over |
| 5 | Flooded |
| 6 | Caved in |
We rolled a 2: sealed on purpose.
Adversaries
| d6 | Adversary |
|---|---|
| 1 | Tomb Robbers |
| 2 | Ghouls |
| 3 | Dire Wolves |
| 4 | Lizardfolk |
| 5 | A Young Dragon |
| 6 | A Bound Demon |
We rolled a 6: a bound demon. We added the ghouls ourselves, because a sealed house needs servants.
Goals
| d6 | Goal |
|---|---|
| 1 | Rescue a Prisoner |
| 2 | Steal a Dragon's Egg |
| 3 | Slay the Beast |
| 4 | Break the Curse |
| 5 | Find the Missing Scouts |
| 6 | Destroy the Idol |
We rolled a 5: find the missing scouts.
Obstacles
| d6 | Obstacle |
|---|---|
| 1 | A Chasm with a Broken Bridge |
| 2 | A Flooded Tunnel |
| 3 | A Rockfall |
| 4 | A Sleepless Guardian |
| 5 | A Riddle Door |
| 6 | A Wall of Green Fire |
We rolled a 5: a riddle door.
Entrances
| d6 | Entrance |
|---|---|
| 1 | An Old Well |
| 2 | A Sewer Grate |
| 3 | A Hollow Tree |
| 4 | A Sinkhole |
| 5 | A Fairy Ring |
| 6 | An Open Grave |
We rolled a 4: a sinkhole. That's how the scouts got in.
Names
| d6 | Name |
|---|---|
| 1 | Black |
| 2 | Weeping |
| 3 | Iron |
| 4 | Sunken |
| 5 | Thorn |
| 6 | Crow |
We rolled a 2: Weeping. Put it before the place, and you have the Weeping Observatory.
Terrain
| d6 | Terrain |
|---|---|
| 1 | Forest |
| 2 | Hills |
| 3 | Marsh |
| 4 | Mountains |
| 5 | Coast |
| 6 | Plains |
We rolled a 2: hills. An observatory wants a hilltop anyway.
Put together, the rolls gave us this:
| Table | Roll | Result |
|---|---|---|
| Origins, structure | 5 | Observatory |
| Origins, built by | 3 | A mad baron |
| Histories | 2 | Sealed on purpose |
| Adversaries | 6 | A bound demon |
| Goals | 5 | Find the missing scouts |
| Obstacles | 5 | A riddle door |
| Entrances | 4 | A sinkhole |
| Names | 2 | Weeping |
| Terrain | 2 | Hills |
A hilltop observatory, sealed on purpose by the mad baron who built it, with a demon bound inside and two scouts who went in through a sinkhole. Everything in the six steps below grows from those nine lines.
Step 1: The background (page 4)
The background is six short answers. Everything else in the dungeon hangs off them, so it's worth getting them down before you draw anything.
- Purpose. Why was it built, and who was it for?
- History. What has happened to it since?
- Adversaries. What enemies and monsters are here?
- Goal. What does the party want in here, and why?
- Obstacle. What stands in the way?
- Summary. What's the one-sentence pitch?
A place doesn't have to be a ruin. A tomb that still keeps its dead in, or a vault still guarded by the order that built it, is a dungeon where nothing went wrong. History covers both. Cairn's dungeon seedsstart the same way, with what the place was for and how it fell.
Keep each answer to a line or two. If you can't write the summary in one sentence, the idea is too big for one night, so trim it.
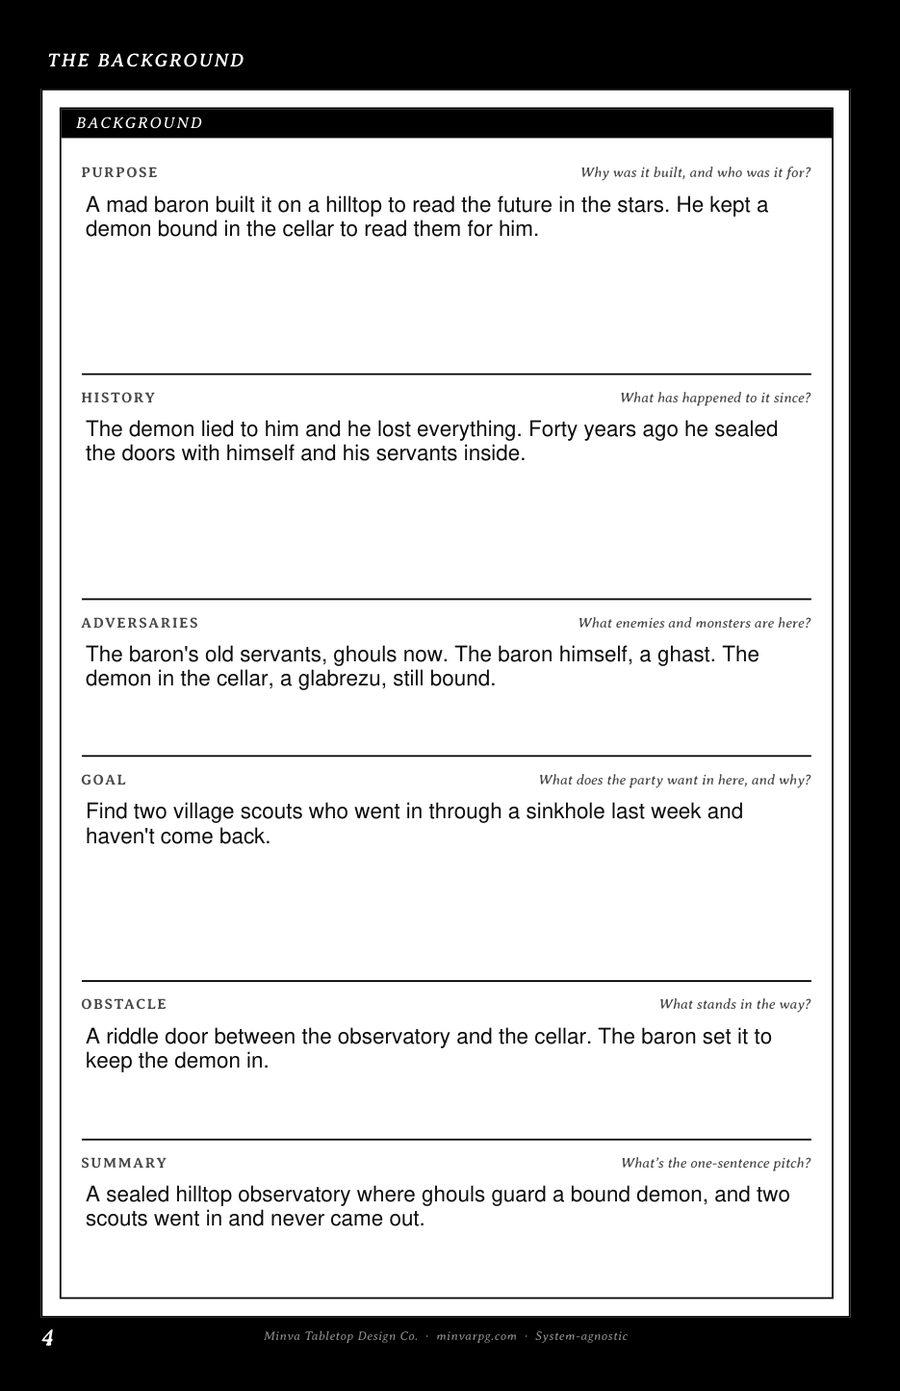
The Weeping Observatory:
- Purpose: A mad baron built it on a hilltop to read the future in the stars. He kept a demon bound in the cellar to read them for him.
- History: The demon lied to him, and he lost everything. Forty years ago he sealed the doors with himself and his servants inside.
- Adversaries: The baron's old servants, who are ghouls now. The baron himself, a ghast. The demon, still bound in the cellar.
- Goal: Find two village scouts who went in through a sinkhole last week and haven't come back.
- Obstacle: A riddle door between the observatory and the cellar. The baron set it to keep the demon in.
- Summary: A sealed hilltop observatory where ghouls guard a bound demon, and two scouts went in and never came out.
Step 2: The map (pages 6, 10 and 11)
Sketch first. Draw the rooms as circles, boxes or hexagons and join them with lines. Don't worry about walls yet. You're working out how the rooms connect, and that's easier to change on a rough draft.
Plan five or six rooms, counting any hidden ones. Then look at the sketch and consider two things:
- A loop. Two routes that meet again. If the party can go around something, they get to choose.
- A second way in. A drain, a sinkhole, a window. Clever players love finding the back door.
A hidden room or two is a nice extra, as long as nothing the party needs is hidden in it.
When the sketch works, draw the real map across the booklet's center pages, and number the rooms.
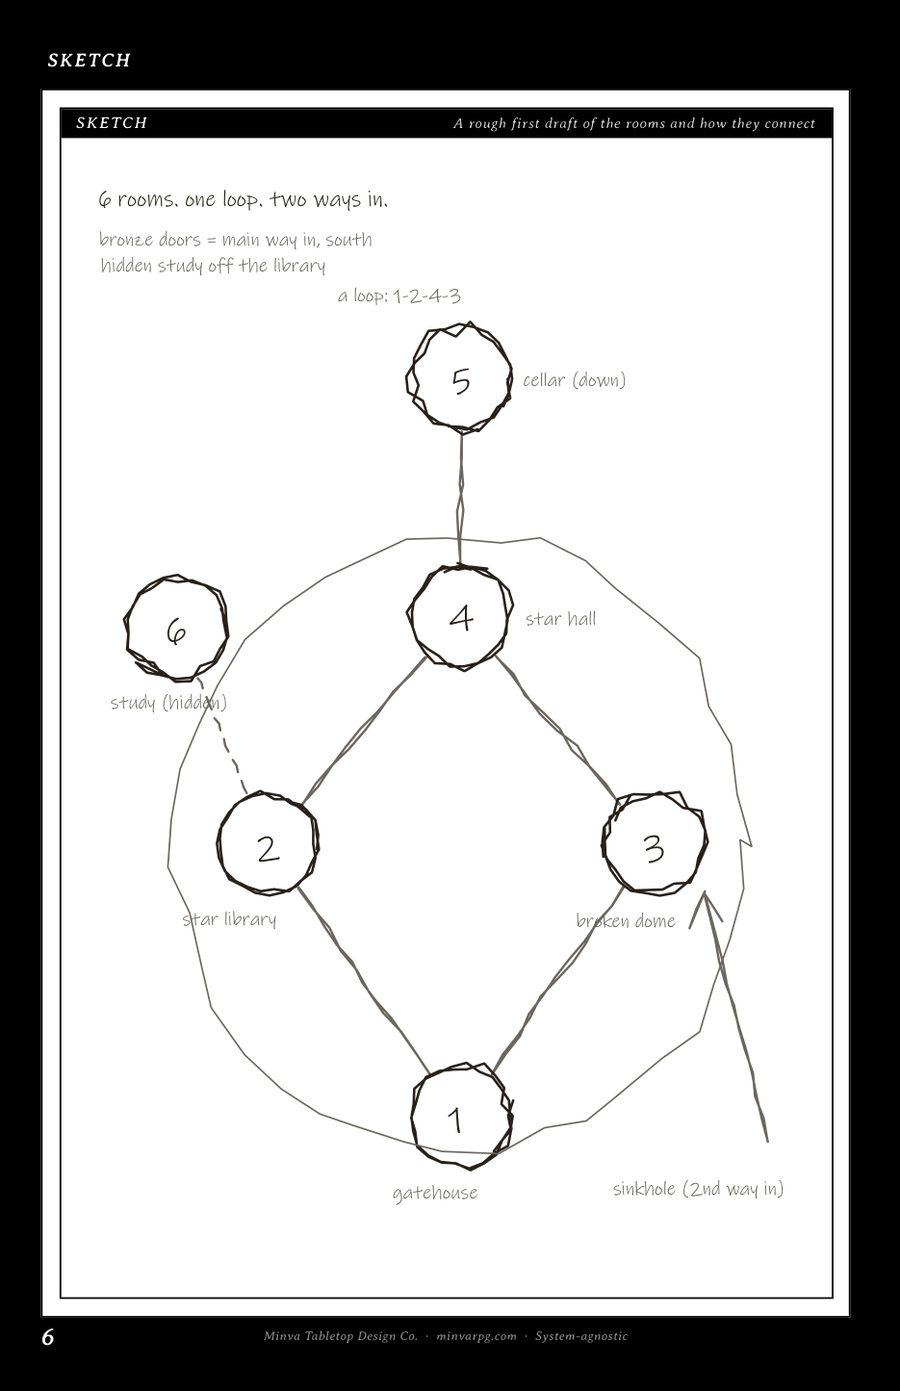
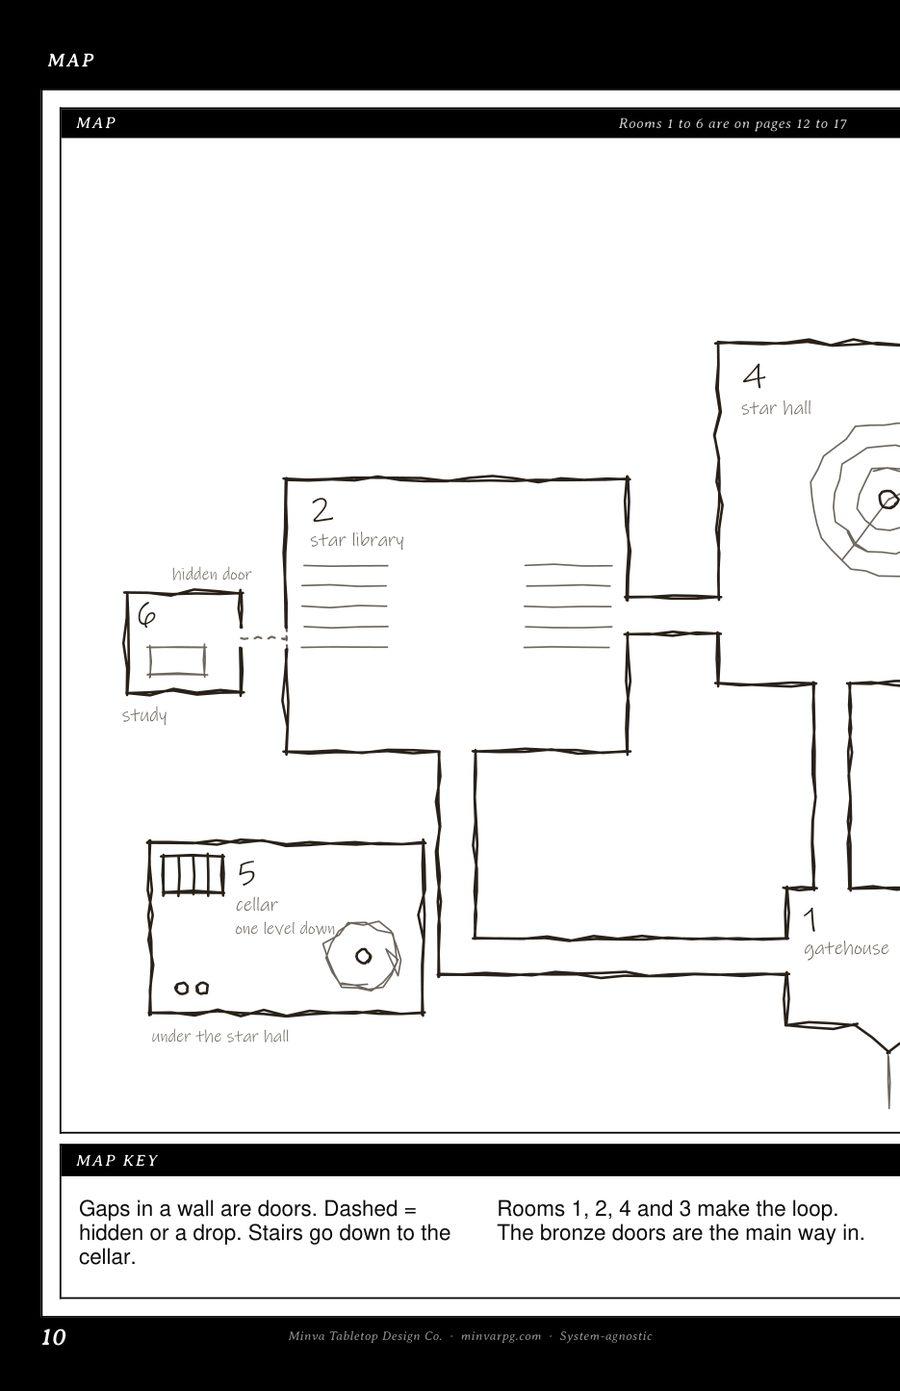
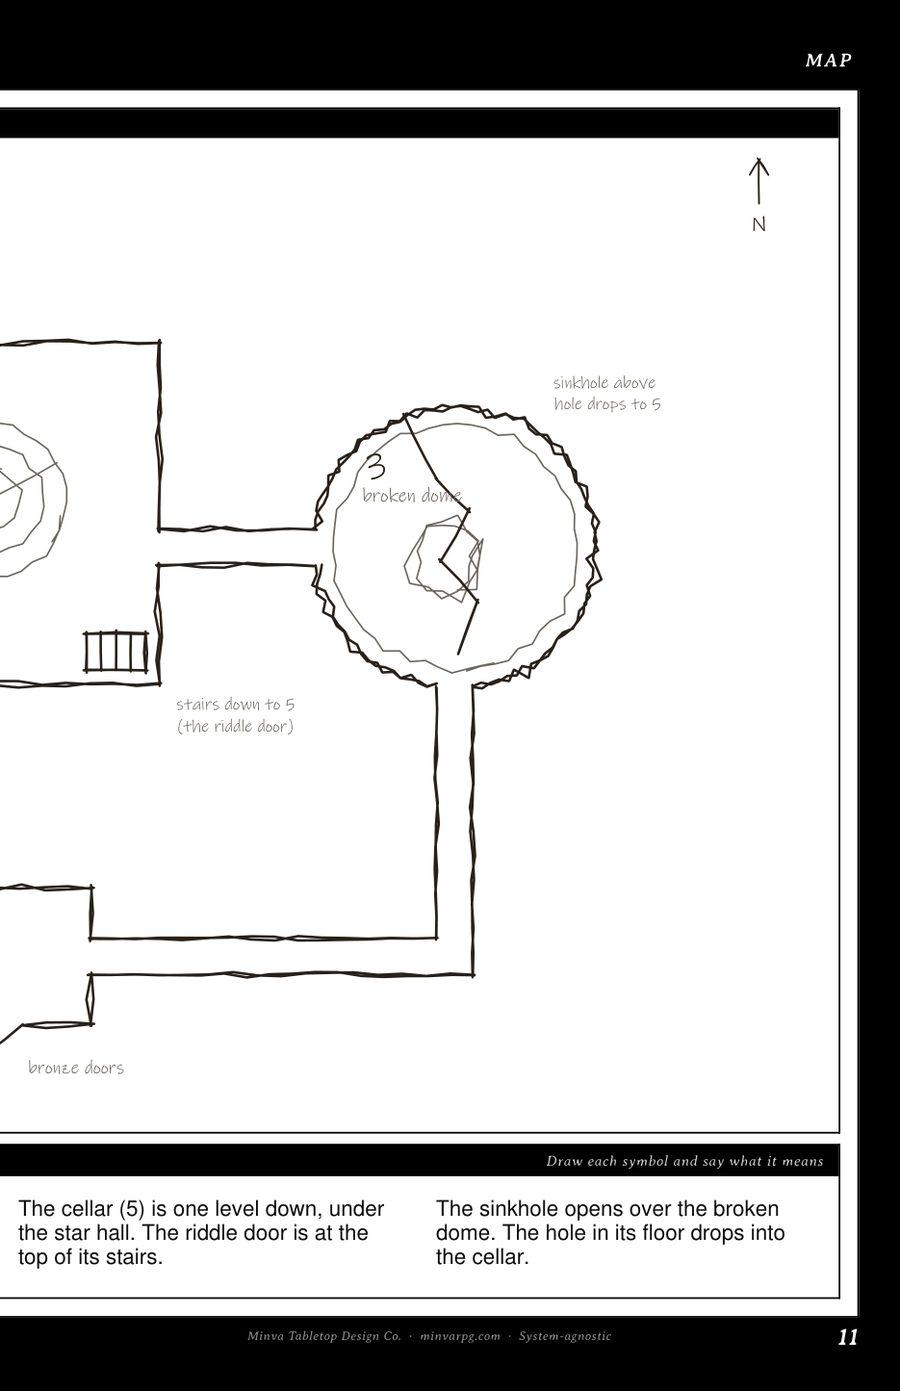
The Weeping Observatory has six rooms:
| Room | Name | Connects to |
|---|---|---|
| 1 | The gatehouse | 2, 3 |
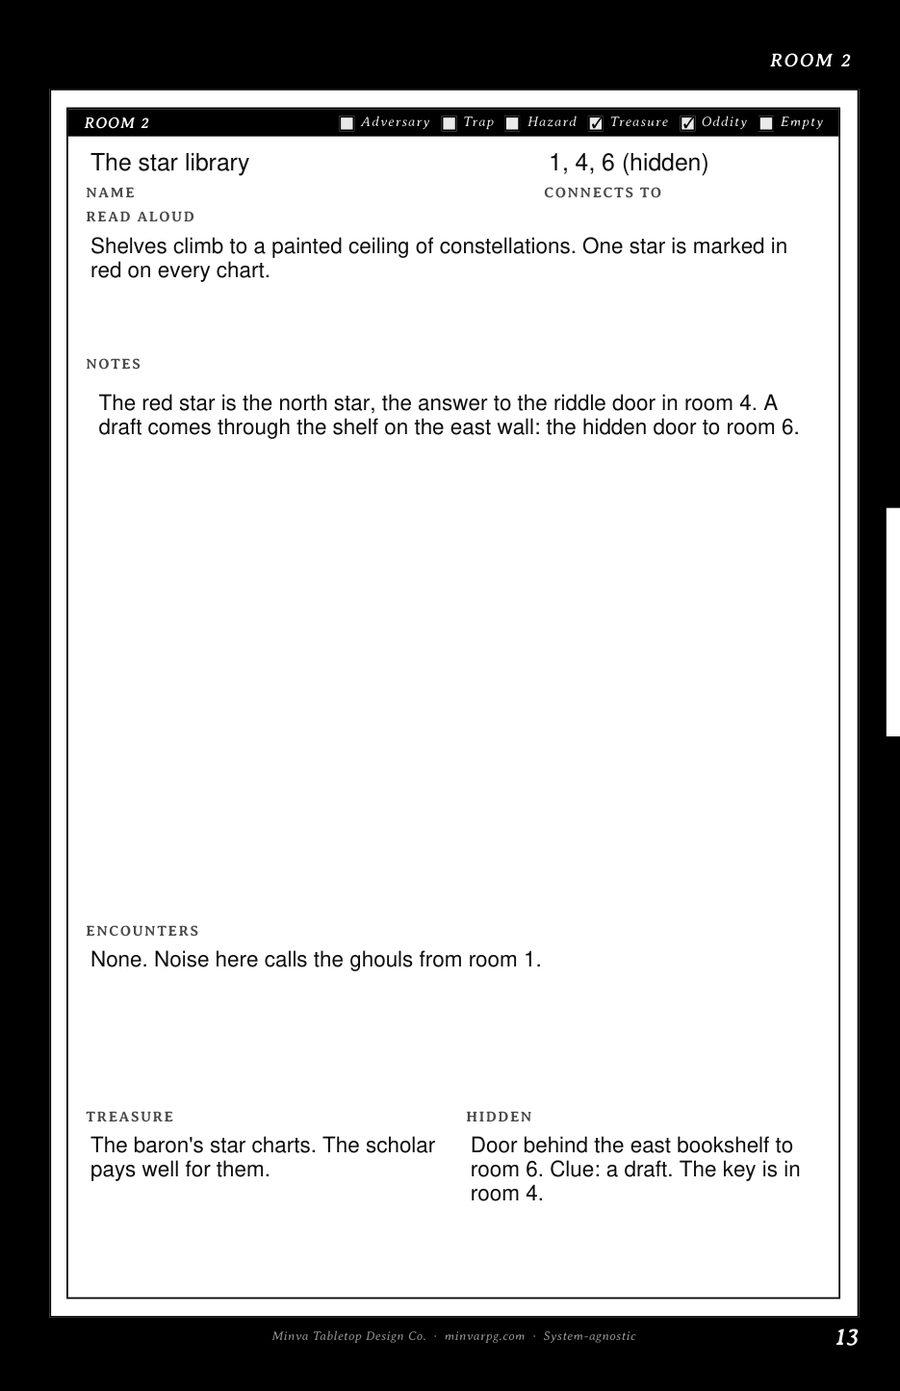
| 2 | The star library | 1, 4, 6 (hidden) |
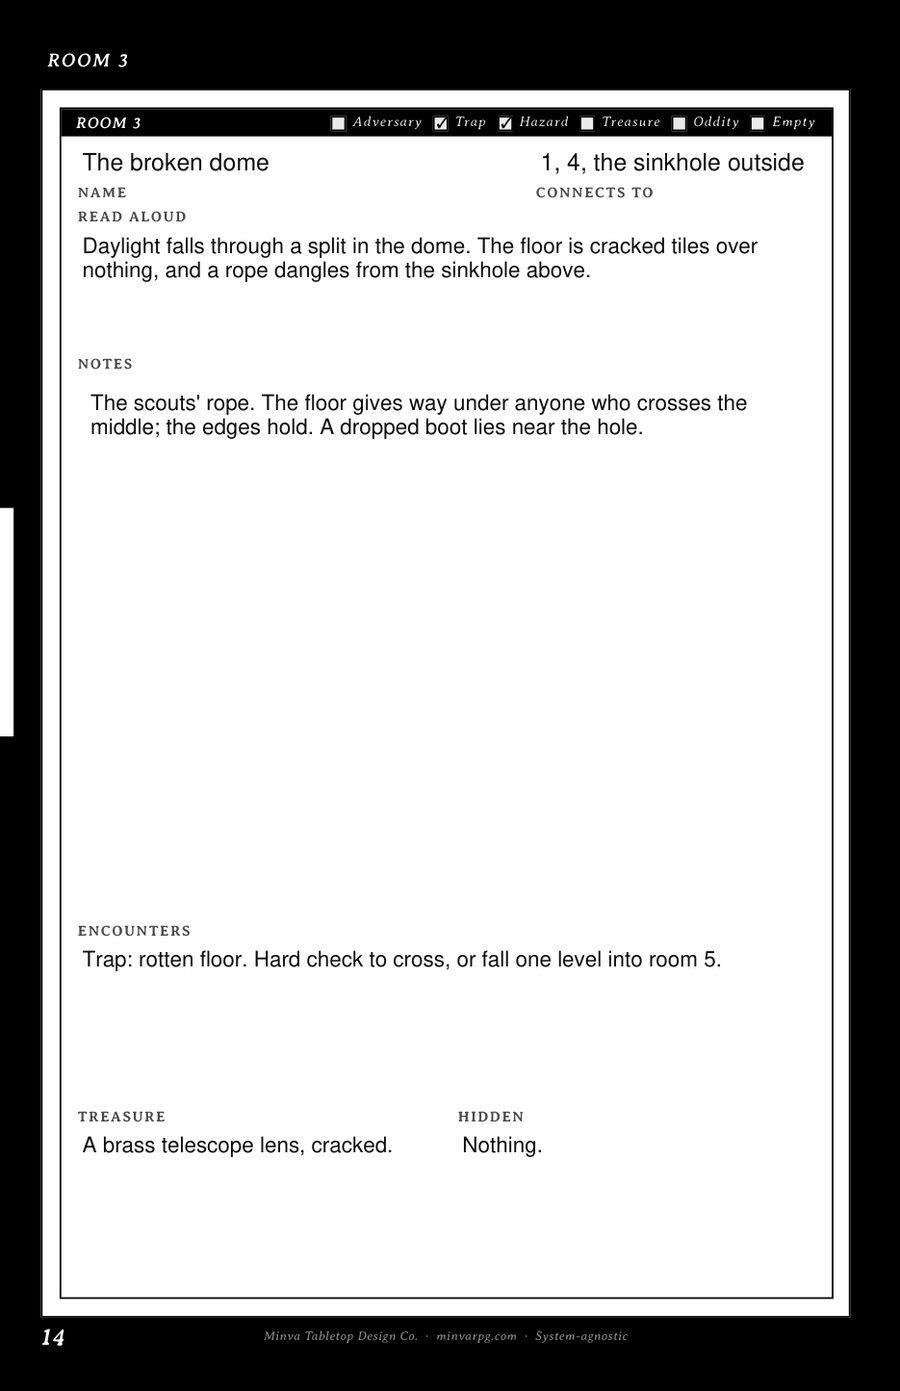
| 3 | The broken dome | 1, 4, and the sinkhole outside |
| 4 | The star hall | 2, 3, 5 |
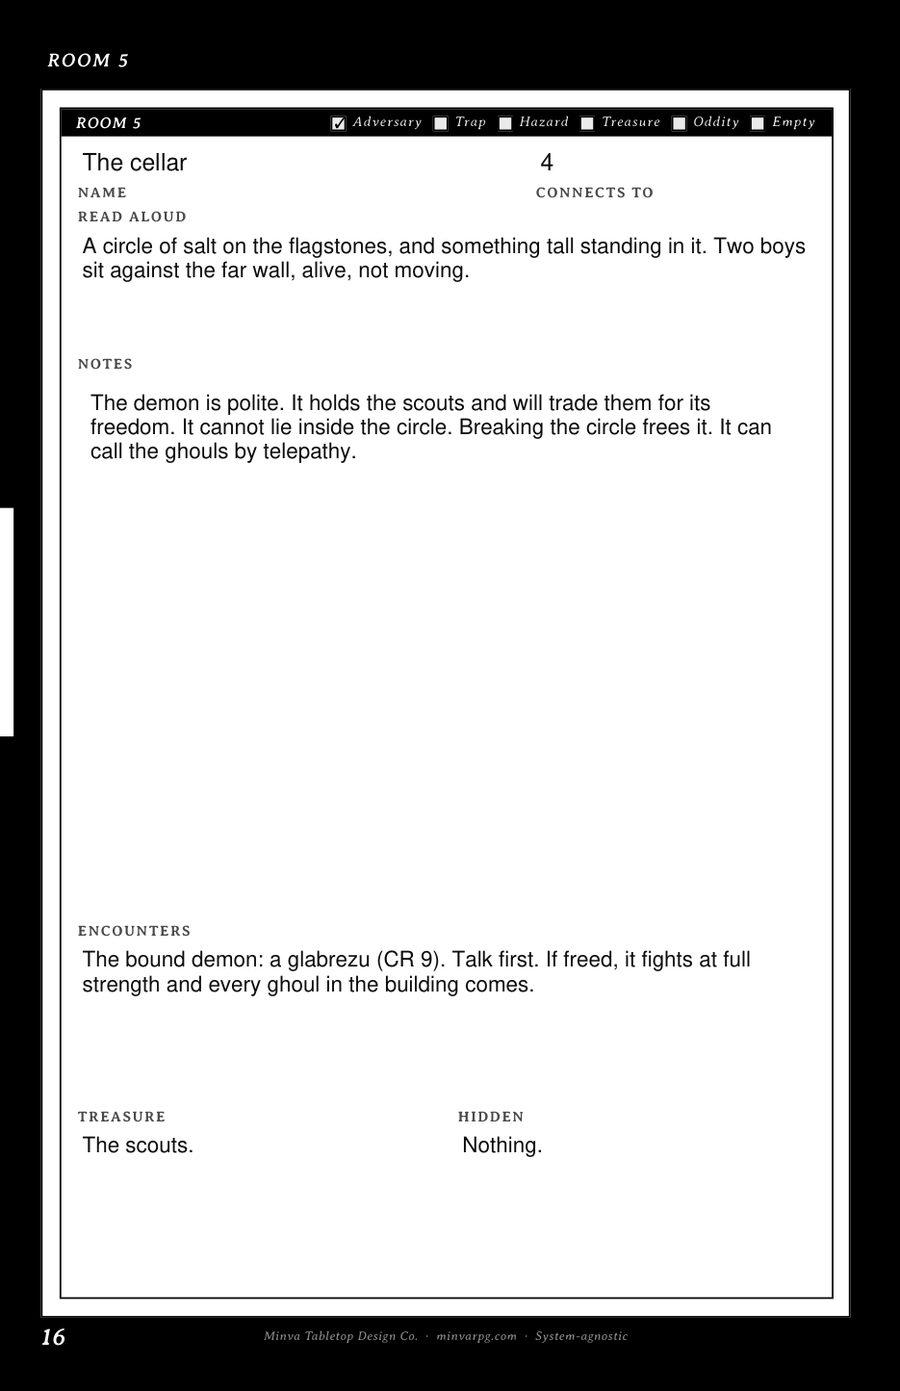
| 5 | The cellar | 4 |
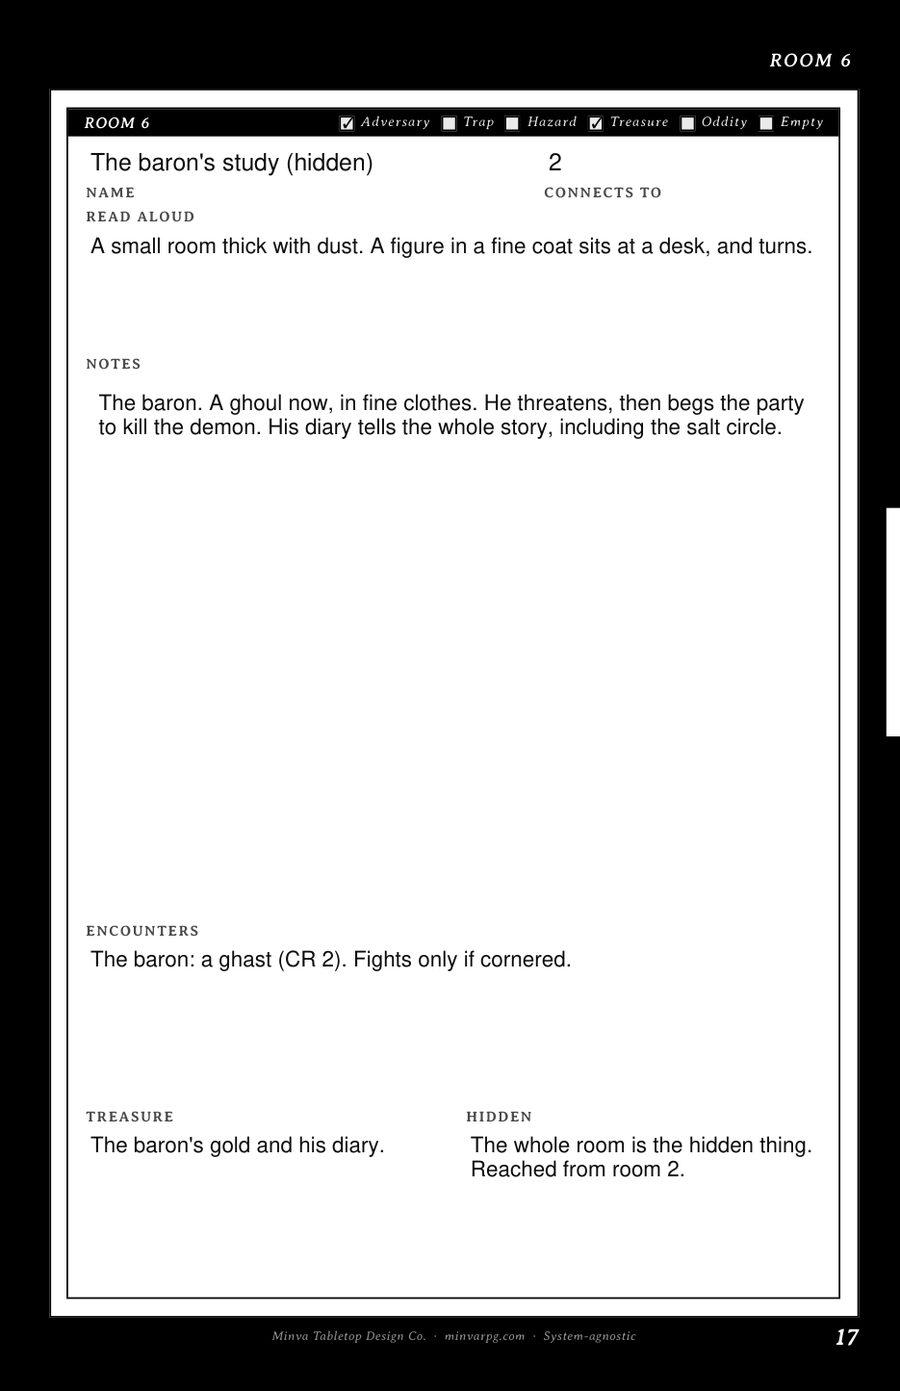
| 6 | The baron's study (hidden) | 2 |
The gatehouse, library, star hall and dome make a loop, so the party can go either way around. The sinkhole is the second way in, and it's how the scouts got inside.
Step 3: The rooms (pages 12 to 17)
Start with the two rooms that matter most: the room that holds the goal, and the room where the adversaries are. Then fill in the rest around them.
Each room page has a line for what you read aloud when the party walks in. Keep it short: what they see, hear and smell first, in two or three sentences. Everything else goes in your notes.
A few things that make rooms work:
- One problem a fight won't solve. A flooded hall, a riddle, a guardian too strong to beat. Somebody has to think their way through.
- A sign for every trap. Scorch marks, rotten boards, scratches by a keyhole. A trap the players could have spotted feels fair. One they couldn't feels like the GM cheated.
- Something in the empty rooms. A room with no monster, trap or treasure still gets one thing worth a look: old supplies, a warning scratched in the wall, a spyhole into the next room.
- Encounters in one place. Fights, traps and anything else with numbers goes under Encounters, so you can run the room at a glance.
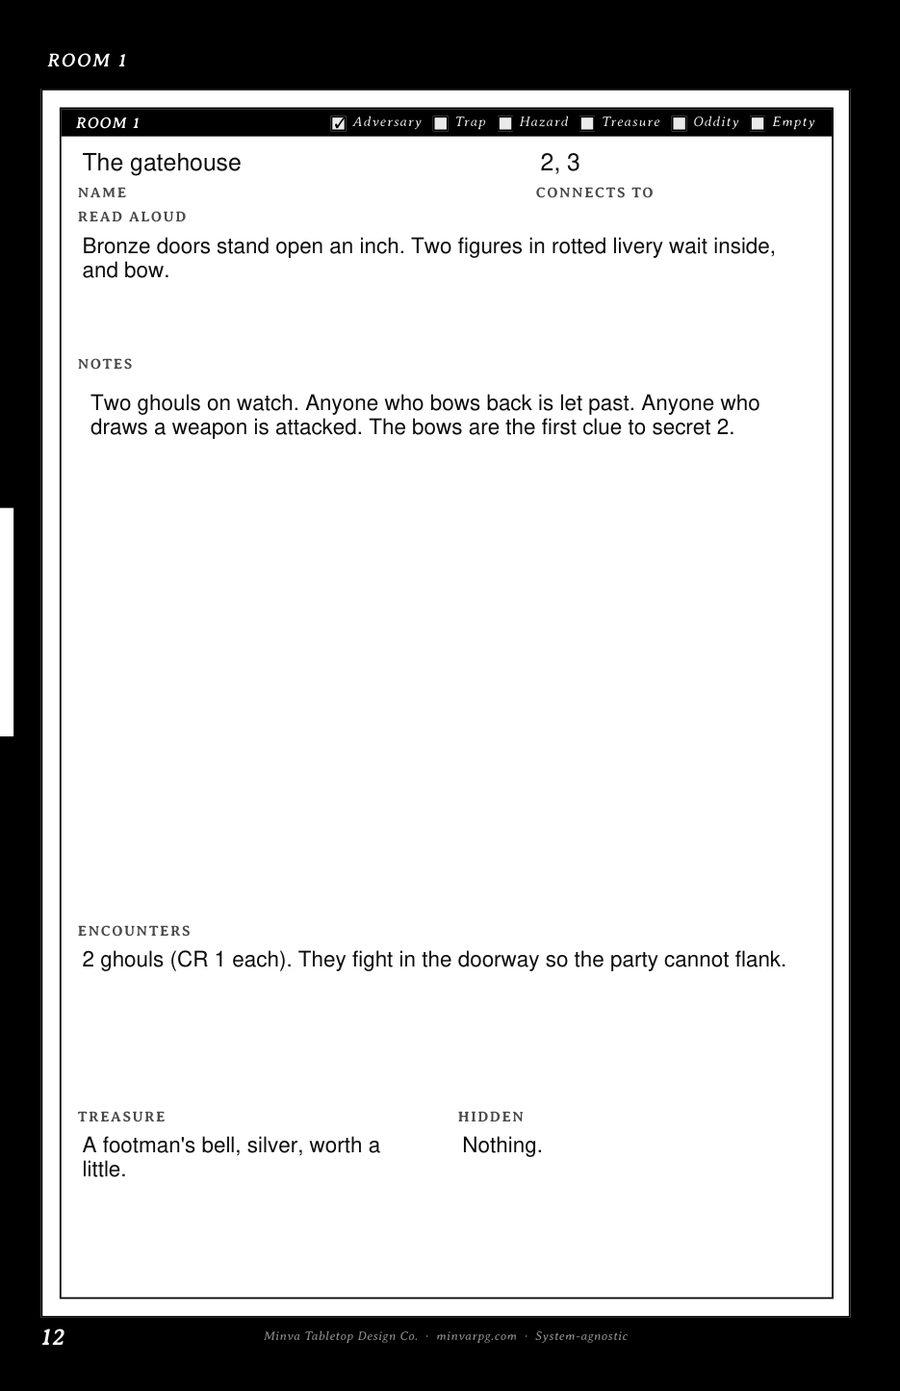
Here's one room from the Weeping Observatory, filled in the way it would look on a room page.
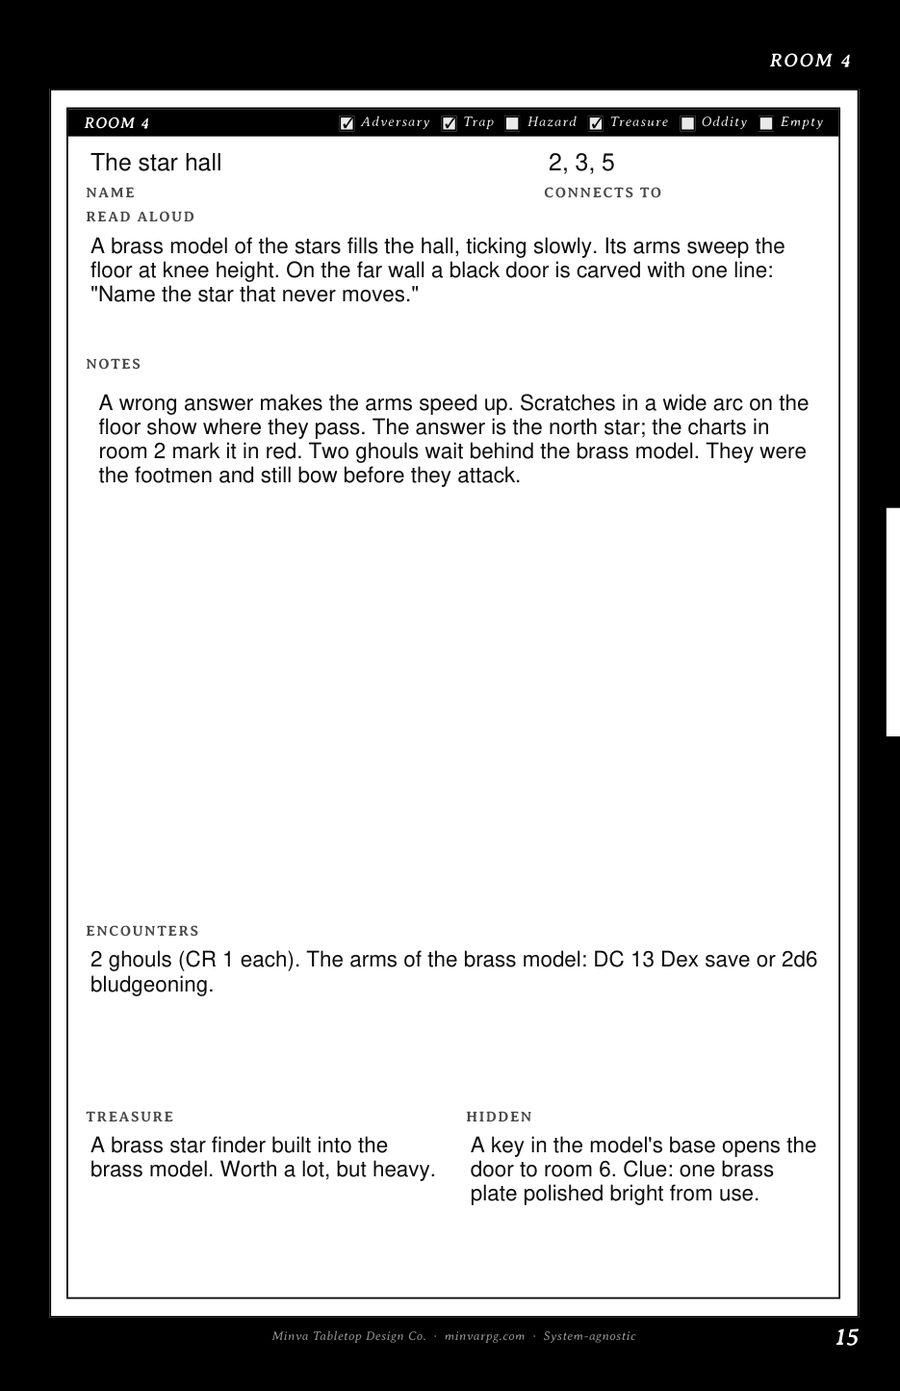
Room 4: The star hall (Adversary, Trap)
- Connects to: 2, 3, 5
- Read aloud: A brass model of the stars fills the hall, ticking slowly. Its arms sweep over the floor at knee height. On the far wall, a black door is carved with one line: "Name the star that never moves."
- Notes: A wrong answer makes the arms of the brass model speed up. Scratches in a wide arc on the floor show where they pass. The answer is the north star, and the charts in room 2 mark it in red. The right answer opens the door to the cellar. Two ghouls wait behind the brass model. They were the baron's footmen, and they still bow before they attack.
- Encounters: 2 ghouls. The arms of the brass model: a hard check to dodge, or take a heavy blow.
- Treasure: A brass star finder, built into the brass model. It's worth a lot, but it's heavy.
- Hidden: A key in the model's base opens the locked door to the baron's study. The clue is one brass plate, polished bright from use.
The d6 tables for traps, triggers, oddities, empty rooms and hazards are in the Random Tables at the end.
Step 4: Adversaries (pages 8 and 9)
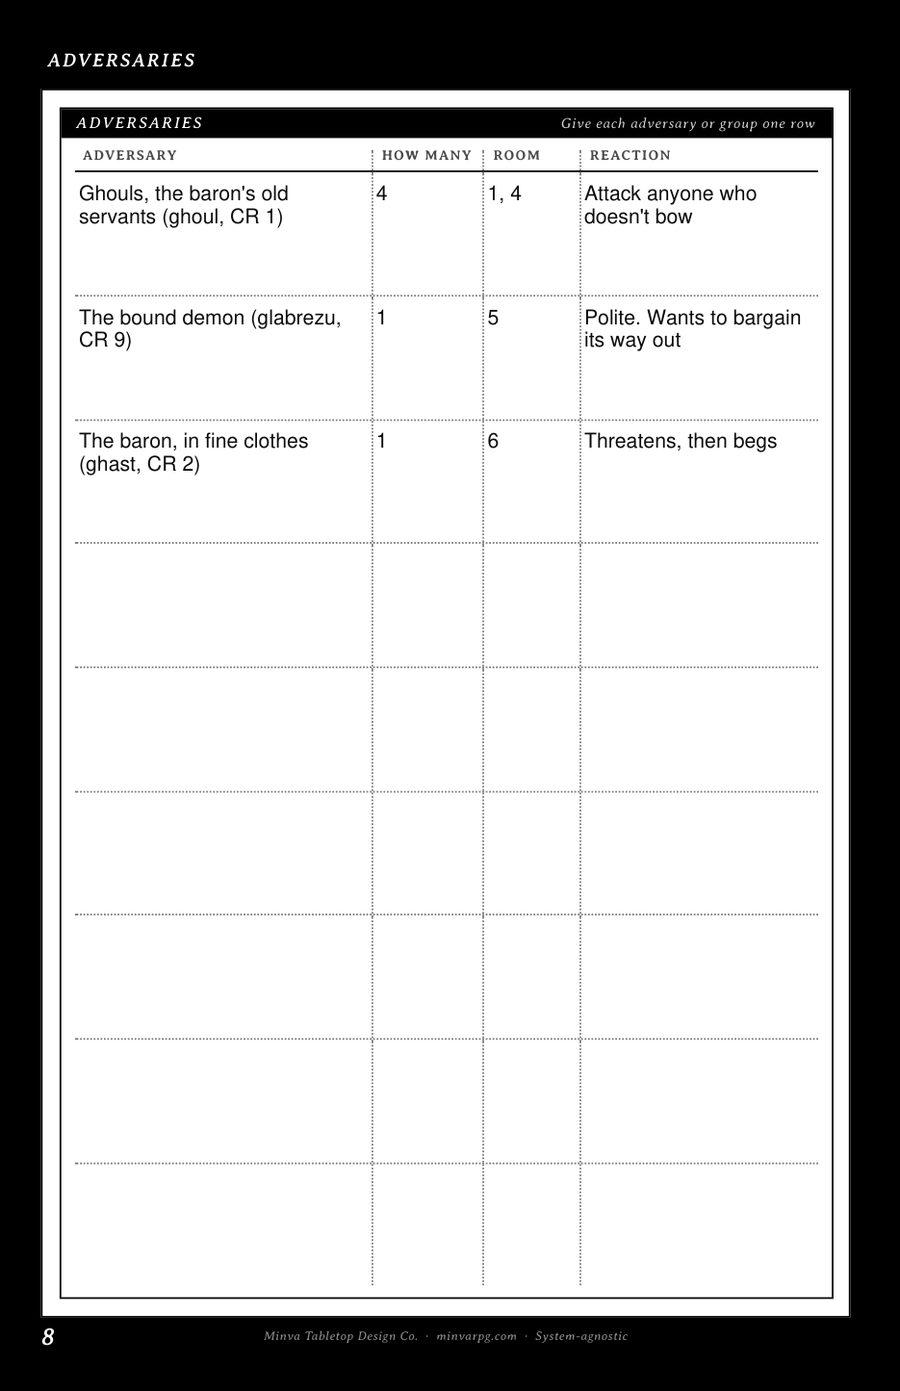
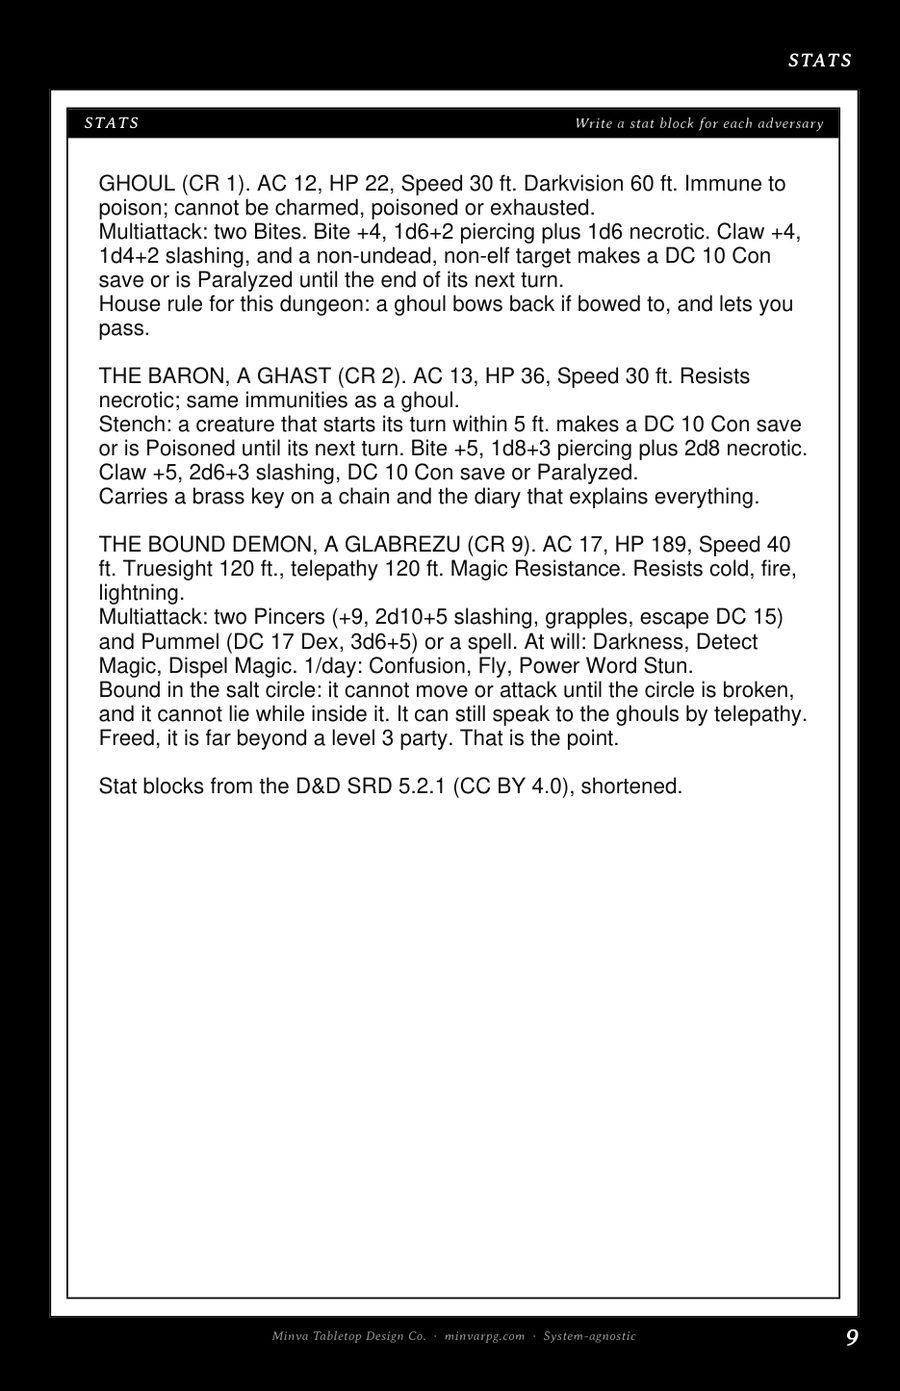
List each adversary or group on its own line: what it is, how many there are, which room it's in, and how it reacts when it sees the party. Write the stat blocks on the facing page, using whatever game you play.
Make at least one of them willing to talk instead of fight. A creature that wants something gives the players a choice, and a choice is more memorable than another round of combat.
The Weeping Observatory:
| Adversary | How many | Room | Reaction |
|---|---|---|---|
| Ghouls, the baron's old servants (ghoul, CR 1) | 4 | 2 in room 1, 2 in room 4 | Attack anyone who doesn't bow |
| The bound demon (glabrezu, CR 9) | 1 | 5 | Polite. Wants to bargain its way out. |
| The baron, a ghoul in fine clothes (ghast, CR 2) | 1 | 6 | Threatens, then begs |
The demon is the one who talks. It's holding the scouts, and it will trade them for its freedom.
We ran this one in D&D, so the stat blocks on page 9 came straight from the SRD: the ghoul for the servants, a ghast for the baron, and a glabrezu for the demon. A glabrezu is a CR 9 bargainer, far beyond a level 3 party, and that's the point. As long as the salt circle holds, it's a conversation. If someone breaks the circle, it isn't. Any system works here. Pick the closest monster in your own book and write it on the page.
The d6 tables for what adversaries are doing, how they react, what they'll trade and the signs they leave are in the Random Tables.
Step 5: Treasure and hidden things (on each room page)
Each room page has two boxes at the bottom: Treasure, and Hidden. Write one long entry or several short ones, whatever the room needs.
A simple way to place treasure is to consider three kinds: one in plain sight, one behind a guard, and one hidden. The first two pay off for showing up and taking a risk. The hidden one is for the players who look closely.
Keep what the party needs easy to find. If the scouts were behind a secret door, a group that missed it would fail the whole adventure. Hidden things should always be a bonus.
Give each hidden thing a clue that points to it: a draft, a smudged carving, a room that's too small for the walls around it. If nobody spots the clue, nothing important is lost.
The Weeping Observatory:
- In plain sight: the baron's star charts in the library. The scholar in the hooks will pay well for them.
- Guarded: the brass star finder in the star hall, behind two ghouls and the swinging arms.
- Hidden: the baron's study, through a locked door behind a bookshelf in the library. The clue is a draft through the shelf, and the key is in the star hall. Inside are the baron's gold and his diary, and the baron himself.
The d6 tables for the catch and the clue are in the Random Tables.
Step 6: Hooks and secrets (pages 5 and 7)
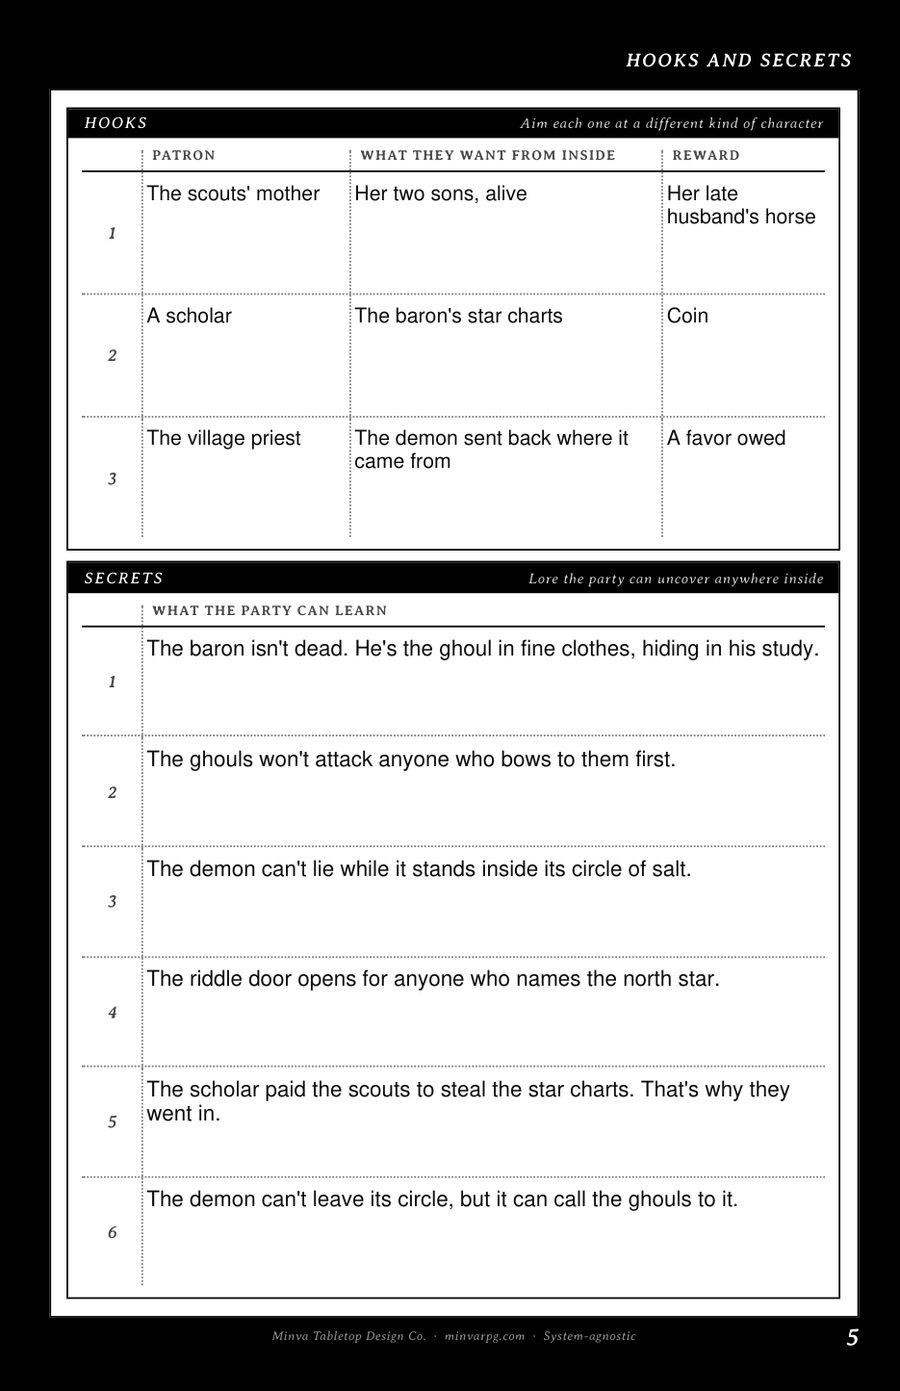
Write three hooks, each aimed at a different kind of character, and say what each one pays. A worried parent will reach a different player than a scholar with a purse. If one hook doesn't land, another will.
Then list six secrets. These are true things about the dungeon that the party can learn anywhere: from a diary, a ghoul's muttering, a carving, or the demon itself. They aren't tied to one room, so whatever the players poke at, you have something to give them. Sly Flourish uses secrets the same way in his prep, and it's one of the most useful habits we've borrowed.
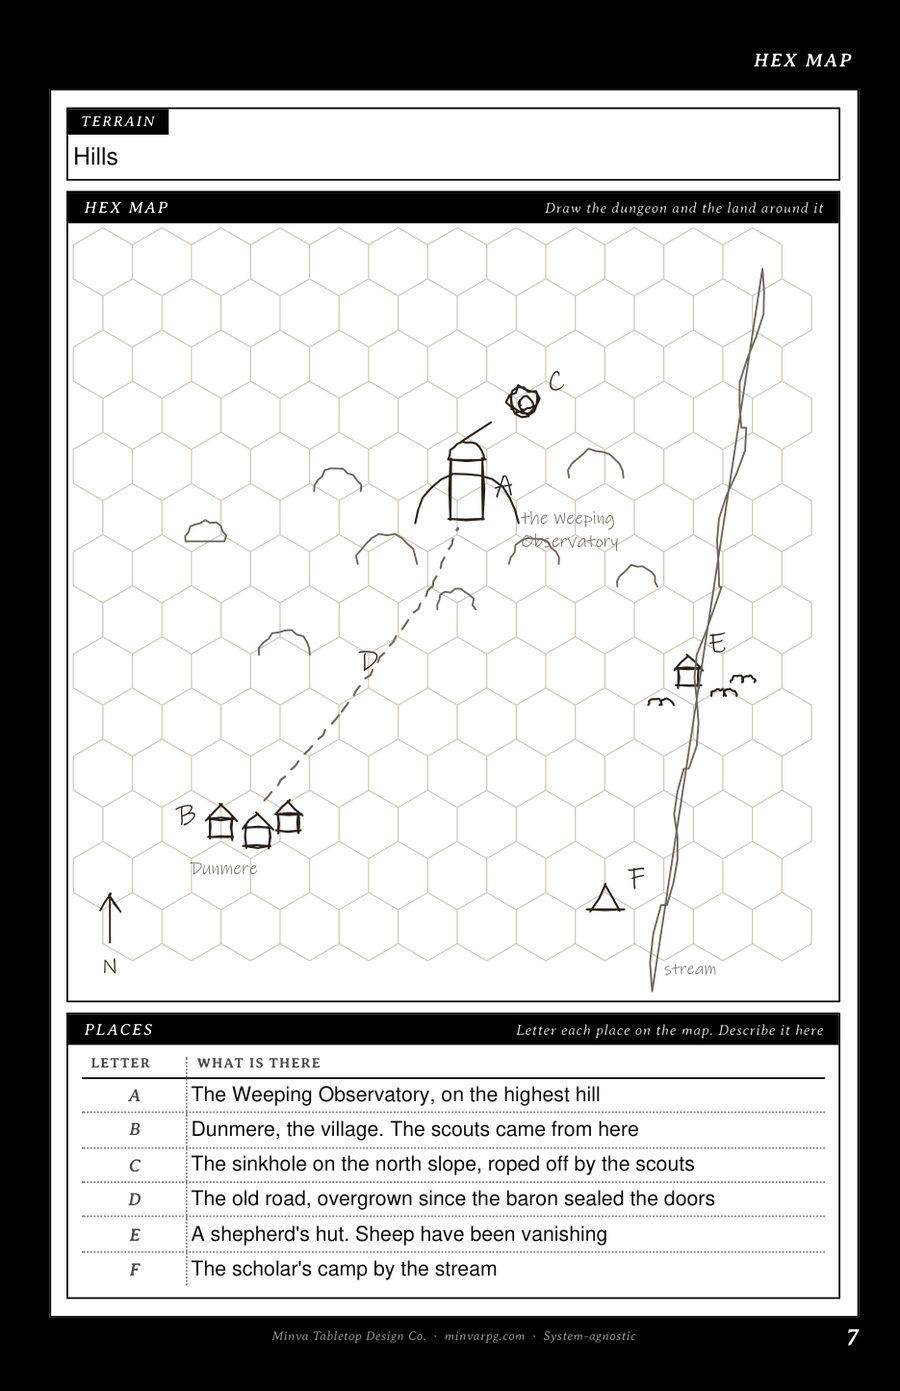
Last, draw the dungeon on the hex map, along with the road that leads to it and anything nearby.
The Weeping Observatory hooks:
| Patron | What they want from inside | Reward | |
|---|---|---|---|
| 1 | The scouts' mother | Her two sons, alive | Her late husband's horse |
| 2 | A scholar | The baron's star charts | Coin |
| 3 | The village priest | The demon sent back where it came from | A favor owed |
The Weeping Observatory secrets:
- The baron isn't dead. He's the ghoul in fine clothes, hiding in his study.
- The ghouls won't attack anyone who bows to them first.
- The demon can't lie while it stands inside its circle of salt.
- The riddle door opens for anyone who names the north star.
- The scholar paid the scouts to steal the star charts. That's why they went in.
- The demon can't leave its circle, but it can call the ghouls to it.
The d6 tables for patrons and rewards are in the Random Tables.
The five room dungeon
If you've looked up how to build a short dungeon before, you've probably met the five room dungeon. It comes from Johnn Four at Roleplaying Tips. The idea is that a small dungeon has five jobs to do, and each room takes one. In our words: a way in with something guarding it, a problem that isn't a fight, a reversal, the high point, and a payoff or a surprise.
Johnn calls the number a guideline, and the order is up to your map. Here's how the Weeping Observatory lines up:
| Job | Room |
|---|---|
| A guarded way in | 1, the gatehouse, with two ghouls on watch |
| A problem that isn't a fight | 2, the star library, where the riddle's answer is |
| A reversal | 3, the broken dome, where the floor gives way |
| The high point | 4 and 5, the riddle door and the demon's bargain |
| A payoff or a surprise | 6, the hidden study, and the baron inside it |
That's why the booklet holds six rooms. Five covers the classic shape, and the sixth leaves room for something hidden.
Random Tables
Every table from the steps above, in one place. Roll a d6 or pick a line. Rolled the same line twice? Take the next one down, or link the two results. These are the tables the booklet didn't have room to print; the booklet's own eight are inside its back cover and in the example above.
Rooms
Traps. Roll d6 once and read across.
| d6 | Sign | Effect |
|---|---|---|
| 1 | Scorch Marks | Fire Bursts Out |
| 2 | A Dented Helmet | Stones Fall |
| 3 | Fresh Mortar | The Door Seals Shut |
| 4 | Rotten Boards | The Floor Gives Way |
| 5 | Scratches by a Keyhole | A Needle Pricks |
| 6 | Tiny Holes in the Wall | Darts Fly |
Trap Triggers
| d6 | Trigger |
|---|---|
| 1 | A Pressure Plate |
| 2 | A Tripwire |
| 3 | A Stone Button |
| 4 | A Counterweight Under the Prize |
| 5 | A Rune that Hears You |
| 6 | A Rigged Door Latch |
Oddities. Roll d6 for each column and combine the results.
| d6 | Thing | What It Does |
|---|---|---|
| 1 | A Statue | Turns to Face You |
| 2 | A Fountain | Talks |
| 3 | A Lever | Opens a Passage |
| 4 | A Mirror | Shows a Vision |
| 5 | An Altar | Gives a Gift |
| 6 | A Chest | Wakes Something |
Empty Rooms
| d6 | Something Worth a Look |
|---|---|
| 1 | A Spyhole |
| 2 | Abandoned Supplies |
| 3 | Words Scratched in the Wall |
| 4 | A Cold Campfire |
| 5 | A Door that Bars from Inside |
| 6 | Noise from Next Door |
Hazards
| d6 | Hazard |
|---|---|
| 1 | A Fast Stream |
| 2 | Poisonous Gas |
| 3 | A Crumbling Ledge |
| 4 | A Chasm |
| 5 | Slick Ice |
| 6 | Choking Spores |
Adversaries
Activity
| d6 | Doing Now |
|---|---|
| 1 | Asleep on Watch |
| 2 | Eating |
| 3 | Mending Gear |
| 4 | Arguing |
| 5 | Hunting |
| 6 | Fleeing in a Panic |
Reactions
| d6 | Reaction |
|---|---|
| 1 | Glad of Company |
| 2 | Curious |
| 3 | Wary |
| 4 | Wants Payment |
| 5 | Threatens |
| 6 | Attacks |
Bargains
| d6 | Bargain |
|---|---|
| 1 | A Safe Path |
| 2 | A Password |
| 3 | Where the Treasure Is |
| 4 | An Enemy's Weakness |
| 5 | Food and Rest |
| 6 | Who Else Is Down Here |
Signs
| d6 | Sign |
|---|---|
| 1 | Muddy Tracks |
| 2 | Gnawed Bones |
| 3 | Cooking Smells |
| 4 | Claw Marks |
| 5 | A Dropped Boot |
| 6 | Sudden Silence |
Treasure and Hidden Things
The Catch
| d6 | The Catch |
|---|---|
| 1 | Heavy |
| 2 | Its Owner Wants It Back |
| 3 | Breaks Easily |
| 4 | Haunted |
| 5 | Hard to Sell |
| 6 | A Fake |
Clues
| d6 | Clue |
|---|---|
| 1 | A Draft |
| 2 | A Smudged Carving |
| 3 | A Hollow Wall |
| 4 | A Clean Line on the Floor |
| 5 | A Room Too Small |
| 6 | One Stone that Differs |
Hooks
Patrons
| d6 | Patron |
|---|---|
| 1 | A Merchant |
| 2 | A Priest |
| 3 | A Scholar |
| 4 | The Lord of the Land |
| 5 | A Worried Parent |
| 6 | A Thief who Got Out |
Rewards
| d6 | Reward |
|---|---|
| 1 | Coin |
| 2 | A Favor Owed |
| 3 | A Share of the Find |
| 4 | A Good Horse |
| 5 | Free Lodging |
| 6 | What They Know |
Credits for ideas (not text): Sly Flourish, Cairn 2e by Yochai Gal, and Johnn Four's 5 Room Dungeons. Monster stats in the example are from the D&D SRD 5.2.1 (CC BY 4.0).
One-Shot Dungeon FAQ
How many rooms should a one-shot dungeon have?
Five or six. That's enough for a fight, a puzzle, a setback and a climax without running past one session. If you find yourself drawing a tenth room, you're probably building two adventures.
How long does it take to build a one-shot dungeon this way?
It depends on how much you write. The steps keep it small, though. The background is six short answers, and each room only needs a few lines. The random tables help most when you're stuck on a blank line.
What is a five room dungeon?
It's Johnn Four's way of planning a short dungeon. Each of five rooms does one job, starting with a guarded way in and ending with a payoff or a surprise. The section above shows how it maps onto the booklet.
Do I need the booklet to use this guide?
No. Every step works on plain paper. The booklet gives each step its own page, keeps the rooms one to a page, and puts the map on the center spread so it opens flat.
Which game systems does this work with?
Any of them. Nothing in the steps or tables uses rules from a particular game. Write your stat blocks in whatever system you play: D&D, Daggerheart, Shadowdark, Cairn or anything else.
The One-Shot Dungeon Builder
A 20-page booklet with a page for every step above: one room per page, a center map spread, and the eight starting tables inside the back cover. Sold as a 3-pack, so you can build three one-shots. It's on its way. Join the newsletter and we'll tell you the day it lands.